Coding Task 3
Polymorphism and Trees
Coding Task 3 Overview
As usual, there are two components to this task. Both the Problem Set and Game Features - Learning Objective portions of this document MUST be completed to achieve the Learning Objective points and pass the course. The Game Features - Comprehensive Understanding is not needed for the Learning Objective requirement, but completing/not completing it will directly impact your grade through CU points. The Problem Set is worth 20 LO points, while the Game Engine Task is worth 30 LO points and 50 CU points.
You should complete the components below in the order they are listed; you will not be able to earn credit for the following component(s) until you complete the previous ones with all available points.
Coding Task 3 assesses Polymorphism and Binary Trees. Both the Problem Set and Game Engine Task will focus on these topics.
The video for this task can be found at https://www.youtube.com/watch?v=l3NGl37kjY4. This video gives an overview of the requirements for this task, namely the Game Features Learning Objective. As always, watching it is optional, but you will find it very useful.
Overview
Problem Set GitHub Repository link: https://github.com/CSE-116/ProblemSet-3
- Clone the starter code from the repository linked above into a new IntelliJ project
- Make sure the src folder is marked as the source root (Right-click the src folder, choose “mark directory as” and choose sources root)
Once you have the project opened in IntelliJ, you'll see a src folder containing 2 Java packages named problem and tests.
To submit your project, run problem.Zipper, which will create a zip file containing the
problem set, and submit it to Autolab.
Specification
For this problem set, you will write the following 3 static methods that are all related to binary trees (the Game Features will include Polymorphism). The signatures for these methods exist in the handout repo and the methods are all stubbed out.
-
In the
problem.ProblemSet3class, complete themaxBSTmethod, which takes aBSTofIntegers as a parameter and returns anint. This method returns the maximum value of the BST according to itsComparator.-
Note that this method does not necessarily return the largest value in the tree since maximum is
defined by the BST's
Comparator. Maximum in this context can be thought of as the value that would come last if the values were fully sorted using thisComparator. -
If the
BSTis empty (ie. the root is null) this method should return 0.
-
Note that this method does not necessarily return the largest value in the tree since maximum is
defined by the BST's
-
In the
problem.ProblemSet3class, complete themaxBinaryTreemethod, which takes aBinaryTreeNodeofIntegers and anIntegerComparatoras parameters and returns anint. This method returns the maximum value of the binary tree, defined by the parameter node as the root of the tree, according to the provided comparator.-
This method is similar to
maxBST, except the tree no longer has the structure of a BST. You should use the compartor to perform any comparisons that are needed to find the maximum value according to that comparator. - If the binary tree is empty (ie. the root is null) this method should return 0.
-
This method is similar to
-
In the
problem.ProblemSet3class, complete theisBSTmethod that takes aBinaryTreeNodeofIntegers and anIntegerComparatoras parameters and returns aboolean. This method returnstrueif the binary tree, defined by the parameter node as the root of the tree, is a valid BST according to the provided comparator, andfalseotherwise.- You may assume that no values are repeated in the tree. Therefore, you can address ties in value any way you'd like, and the result will be the same.
- An empty tree is considered a valid BST.
Testing Requirements
Write JUnit tests for the following methods from the specification in the tests.TestProblemSet3
class. These tests should be annotated with @Test.
-
maxBST-
Write tests for the
maxBSTmethod. Test that the proper value is returned in a variety of cases. -
When testing this method, you will need to create BST objects. You can use any/all of the
provided
IntegerComparatorsto create these BSTs.
-
Write tests for the
-
maxBinaryTreeandisBST- Tests for these methods are provided for you. You do not need to write any additional tests for these methods.
Programming Requirements
Implement the methods from the specification. You may wish to complete the Testing Requirements before you begin implementation, and it's suggested that you run these tests as you implement the methods.
Autolab Feedback
Feedback from Autolab will be given in several phases. If you don't complete a phase, then feedback for the following phase(s) will not be given. You must complete all phases to earn the required score of 20 LOs. For the problem set, the phases will be as follows:
-
Running your tests on a correct solution
- Your tests will be run against a solution that is known to be correct. If your tests do not pass this correct solution, there is an error somewhere in your tests that must be fixed before you can move on with the assignment. If your tests don't get past this check, you should re-read this document and make sure you implemented your tests and code according the specification. You should also make sure that if there are multiple correct outputs to the input in your tests cases that you accept any of the outputs as correct.
-
Checking your tests for feature coverage
- The next phase is to check if your tests check for a variety of features defined by different inputs. You should write at least one test case for each feature to pass this phase.
- Passing this phase does not necessarily mean that your testing is completely thorough. Satisfying Autolab is the bare minimum testing requirement. Not all possible inputs are checked and it is sometimes possible to pass this phase with weak testing. If you are struggling to earn credit for code that you believe is correct, you should write more than the required tests
-
Running my tests on your solution
- Once Autolab is happy with your tests, it will run my tests against your code to check it for correctness. If your testing is thorough, and your code passes your tests, then you should pass this phase. If you pass your tests, but fail one of mine, it is an indicator that you should write more tests to help expose your bug.
Once you have successfully completed all three phases, you will have completed this Problem Set and Autolab will confirm this with a score of 20 LOs.
Overview
You will continue to build functionality for the Game Engine in this component of the task. This will be done on top of the code written for the previous tasks; you should not reclone or remove said code for this task or any future Game Features components.
As with the previous tasks, there are two parts to the Game Features component: the Learning Objective and Comprehensive Understanding. The Learning Objective portion must be completed with a score of 30 LOs before the Comprehensive Understanding unlocks. Both portions of the Game Features will be submitted to the same assignment on Autolab.
The content of the Learning Objective is primarily used in the Game Engine by Pacman. To play Pacman, during and
after completing this Learning Objective, navigate to the class app.Configuration and change the
GAME constant to "pacman". As the size of the Pacman level is quite large, you should also
set the value of ZOOM to 2.0 or 1.0 (it can technically be non-whole, but not
without serious graphical bugs).
It may look like there are a lot of classes to create and a lot of code to write for this task, but don't let this intimiate you. While that is true, most of the individual pieces are not overly complex, and have a lot of similarity between them. The amount of unique code you must write, and problems you must solve, is roughly in line with earlier tasks.
You will need to use various utility methods found in the app.gameengine.utils.PacmanUtils class for
this task. However, one of these methods is missing from the handout. You can find it here, and should copy that method into your own class.
For this Learning Objective portion, you will be writing code in the following classes which already exist:
Agent, located in theapp.gameengine.model.gameobjectspackage.Ghost, located in theapp.games.pacmanpackage.Collectible, located in theapp.gameengine.model.gameobjectspackage.-
MagicPickup,AxePickup, andPotionPickup, located in theapp.games.commonobjectspackage. Player, located in theapp.gameengine.model.gameobjectspackage.LevelParser, located in theapp.gameenginepackage.
You should create the TestTask3 class in your app.tests package. We have provided some
tests for the various Decision and Collectible subclasses, as well as the
LevelParser updates. They can be accessed at this link: TestTask3.java. You can open this link in a new tab to copy
and paste the content into your project, or right click and select "save link as", then download the file to the
correct location within the project.
These tests are not overly thorough, but should validate some of the basic behavior of the features that they test, and let you know if you are on the right track.
You will also have to create many additional classes, which will be specified in the following instructions.
Many of the features of this task, primarily dealing with the player's inventory and collectibles, heavily rely on each other, so one feature being implemented incorrectly may cause tests for other features to fail. Feedback in Autolab will usually note when this applies, but keep this in mind when looking over your feedback.
Specification
You should read through all the following sections before you begin to implement the methods from the specification. Note that you will not receive feedback on the correctness of these methods until you've completed the testing component of this task (see the "Autolab Feedback" section for more details). However, you must at least create every class/method from this specification to receive feedback. You can "stub out" these methods by having them always return a fixed value, but they must exist so the grading code, and your tests, can compile and run.
Some of the methods in this task will make use of the BinaryTreeNode class, found in the
app.gameengine.model.datastructures package. You are required to use this class. It is identical to the
BinaryTreeNode class used in the Problem Set. Note that this is not the BST class
from the Problem Set.
For the Learning Objective portion of the Game Features component for this task, you will implement the following functionality:
-
Decision: In theapp.gameengine.model.aipackage, create an abstract class namedDecision. This represents a node in the decision tree that will either make a decision or take an action.-
Create a constructor which takes in an
Agentand aStringas parameters, and store them as instance variables. These represent theAgentwhose behavior is being is being controlled by thisDecision, and the name of this node. -
Create methods named
getNameandsetName, which are a getter and setter for theStringname from the constructor. The purpose of the name is primarly for testing, and for differentiating nodes of the same type within a single tree. -
Create a method named
getAgentwhich is a getter for theAgentfrom the constructor. You do not need to create a setter for this instance variable. -
Create an abstract method named
decidewhich returns abooleanand takes in adoubleand aLevel, representing the time since the last call and the current level, respectively.- As this method is abstract, it has no implementation. In child classes, this method will use various states of the game, level, or agent to determine which action to take.
-
Create an abstract method named
doActionwhich returnsvoidand takes in adoubleand aLevel, representing the time since the last call and the current level, respectively.-
As this method is abstract, it has no implementation. In child classes, this method will take
various actions to modify the state of the
Agentto achieve the desired behavior. This method will only be called if it is determined that this is the action that should be taken, according to the rest of the decision tree.
-
As this method is abstract, it has no implementation. In child classes, this method will take
various actions to modify the state of the
-
Create a constructor which takes in an
-
DecisionTree: In theapp.gameengine.model.aipackage, create a class namedDecisionTree. This class will possess a binary tree ofDecisionobjects, to determine what behavior anAgentshould take, and accordingly take that action.-
Create a constructor that takes in a
BinaryTreeNodeofDecisions, and store it as an instance variable. -
Create methods named
getTreeandsetTree, which are a getter and setter for theBinaryTreeNodefrom the constructor. -
Create a method named
traversethat returns aDecisionand takes aBinaryTreeNodeofDecisions, adouble, and aLevelas parameters. Thedoublerepresents the amount of time passed since the last update, and theLevelis the current level.-
This method will traverse through the tree in the parameter (not the tree in
your instance variable), making decisions to go left or right by calling
decideon theDecisionstored in each tree node. A value oftrueindicates that you should "travel" to the right child node, and a value offalsemeans travel to the left child node. - When a leaf node is reached (a node where both left and right children are null), the
Decisionvalue at that node should be returned. Keep in mind that the node in the parameter itself might be a leaf node. -
When calling
decide, you should pass in thedoubleandLevelfrom the parameters as arguments. -
If a leaf node cannot be reached, this method should return null. This can happen if the tree is
empty, or if the tree has a node with only one child. In the case of a node with only one child,
the method should return null if that node's decision tells it to traverse in the opposite
direction of that child. For example, if a tree has only a left node, it is not a leaf, but if
the
decidemethod returnstrue, you cannot traverse to the right, and should return null. This is useful for handling poor tree structures, or having a state that performs no action.
-
This method will traverse through the tree in the parameter (not the tree in
your instance variable), making decisions to go left or right by calling
-
Create a second, overloaded
traversemethod that returnsvoidand takes adoubleand aLevel, which represent the amount of time passed since the last update and the current level, respectively.-
This method will call the first
traversemethod, passing the root of the tree (the instance variable) as the first argument, and the parameters as the remaining arguments. Then calldoActionon the returnedDecision, again using the parameters of this method as the arguments. -
If the returned
Decisionis null, this method will do nothing.
-
This method will call the first
-
Create a constructor that takes in a
Create the package app.gameengine.model.ai. Remember that a package is just a folder containing
Java files. This package will contain a number of files that allow the ghosts in Pacman to have dynamic behavior
depending on the state of the game at any given time.
You will be using a decision tree to determine behavior, which will be represented as a binary tree of
Decision objects. These decisions will determine either which action to take, depending on the game
state, or perform an action, like movement.
-
IsActive: In theapp.gameengine.model.ai.pacmanpackage, create a class namedIsActivewhich extendsDecision. This class will represent a decision on whether a ghost is in an active state, which is either chasing the player or retreating to one corner of the level (scattering).-
Create a constructor which takes in a
Ghostand aString, which are passed to the super constructor as theAgentand name. This is possible due to polymorphism, sinceGhostis a subclass ofAgent. You should also store the ghost as an instance variable. -
Override the
decidemethod, which should returntrueif theGhostfrom the constructor is in a chasing or scattering state, andfalseotherwise.-
You can call the
getStatemethod on aGhostto access its state. This method returns aStringrepresenting which of several states the ghost is in. -
If the state is exactly
"Chase"or"Scatter", then the ghost is considered to be in an active state, and this method should returntrue.
-
You can call the
-
Override the
doActionmethod to do nothing.
-
Create a constructor which takes in a
-
Idle: In theapp.gameengine.model.ai.pacmanpackage, create a class namedIdlewhich extendsDecision. This class will represent an action of bouncing up and down while the ghost is at its home location in the center of the level.-
Create a constructor which takes in a
Ghostand aString, which are passed to the super constructor as theAgentand name. You should also store the ghost as an instance variable. -
Override the
decidemethod to always returnfalse. -
Override the
doActionmethod to do the following: If the magnitude of the ghost's velocity is greater than 0, this method should do nothing. Otherwise, you should negate both the x and y components of the ghost's orientation. Afterwards, you should call thefollowPathmethod on theGhostobject, passing in thedoublefrom the parameter.-
You can calculate the magnitude of a vector as the square root of the sum of the squares of the
x and y components. It is equivalent to the euclidean distance between the vector and (0, 0).
You can (and should) use the
magnitudemethod within theVector2Dclass. -
You should modify the ghost's orientation using the
setOrientationmethod. Although there exists anegatemethod in theVector2Dclass, which negates both the x and y components of aVector2D, thesetOrientationmethod is needed to update the sprite of the ghost. -
This
followPathmethod is the same as the one from the Task 2 CU, but is implemented differently within theGhostclass. So, even if you did not complete that CU, this will still function as intended.
-
You can calculate the magnitude of a vector as the square root of the sum of the squares of the
x and y components. It is equivalent to the euclidean distance between the vector and (0, 0).
You can (and should) use the
-
Create a constructor which takes in a
-
Chase: In theapp.gameengine.model.ai.pacmanpackage, create a class namedChasewhich extendsDecision. This class will represent both a decision of whether a ghost is actively chasing the player, as well as the action of chasing.-
Create a constructor which takes in a
Ghost, aPacmanGame, and aString. You should pass theGhostandStringto the super constructor, and store theGhostandPacmanGameas instance variables. -
You should create an additional
Vector2Dinstance variable to store the last whole-numbered location of the ghost. The initial value of this vector should be null. This will be used by several of the utilities provided, namely to ensure that the ghost does turn 180 degrees, and only changes directions when fully aligned to a tile. -
Override the
decidemethod to return whether the ghost is in the chasing state.-
You can call the
getStatemethod on aGhostto access its state. This method returns aStringrepresenting which of several states the ghost is in. -
If the state is exactly
"Chase", then the ghost is chasing the player, and this method should returntrue.
-
You can call the
-
Override the
doActionmethod. This method should use the methods in thePacmanUtilsclass to do the following sequence of actions. Only take these actions if thePacmanUtils.canActmethod returnstrue, passing in theGhostandVector2Dinstance variables and thedoubleparameter.-
Find the tile that the ghost is targeting by calling the
PacmanUtils.getChaseTargetmethod. Note that you must pass in aPacmanLevel, so you cannot use theLevelparameter. Instead you should callgetCurrentLevelon thePacmanGameinstance variable. -
Get the valid directions of movement for the ghost by calling the
PacmanUtils.getValidDirsmethod, again with the game's current level and the ghost. -
Find the actual direction of movement by calling the
PacmanUtils.getBestDirectionmethod, passing in the valid directions, the location of the ghost, and the targetVector2D. -
The
Vector2Dreturned bygetBestDirectionmay be null. If so, skip this step. If it is not null, set the orientation of the ghost to the x and y components of that best direction. Again, you should use thesetOrientationmethod to do so. -
Set your
Vector2Dinstance variable equal to the rounded value of the ghost's location. You may callMath.roundon the individual components, or use theVector2D.roundmethod.
followPathmethod on the ghost object, passing in thedoubleparameter. You should do this even if thecanActmethod returnsfalse. -
Find the tile that the ghost is targeting by calling the
-
Create a constructor which takes in a
-
Scatter: In theapp.gameengine.model.ai.pacmanpackage, create a class namedScatterwhich extendsDecision. This class will represent the action of scattering, which is when the ghosts retreat to the corners of the level to give the player some breathing room.-
Create a constructor which takes in a
Ghost, aPacmanGame, and aString. You should pass theGhostandStringto the super constructor, and store theGhostandPacmanGameas instance variables. -
You should create an additional
Vector2Dinstance variable to store the last whole-numbered location of the ghost. The initial value of this vector should be null. This will be used by several of the utilities provided, namely to ensure that the ghost does turn 180 degrees, and only changes directions when fully aligned to a tile. -
Override the
decidemethod to always returnfalse. -
Override the
doActionmethod. The behavior of this method should be identical to that of theChaseclass, except using thePacmanUtils.getScatterTargetmethod instead of thePacmanUtils.getChaseTargetmethod.
-
Create a constructor which takes in a
-
Dead: In theapp.gameengine.model.ai.pacmanpackage, create a class namedDeadwhich extendsDecision. This class will represent the decision of whether a ghost has been eaten and should return to the spawn area, as well as the action of returning home.-
Create a constructor which takes in a
Ghost, aPacmanGame, and aString. You should pass theGhostandStringto the super constructor, and store theGhostandPacmanGameas instance variables. -
You should create an additional
Vector2Dinstance variable to store the last whole-numbered location of the ghost. The initial value of this vector should be null. This will be used by several of the utilities provided, namely to ensure that the ghost does turn 180 degrees, and only changes directions when fully aligned to a tile. -
Override the
decidemethod to return whether the ghost is in the dead state.-
You can call the
getStatemethod on aGhostto access its state. This method returns aStringrepresenting which of several states the ghost is in. -
If the state is exactly
"Dead", then the ghost is dead, and this method should returntrue.
-
You can call the
-
Override the
doActionmethod. The behavior of this method should be identical to that of theChaseclass, except using thePacmanUtils.getHomeTargetmethod instead of thePacmanUtils.getChaseTargetmethod. Note that this method only takes one argument, and does not need the ghost itself to be passed in.
-
Create a constructor which takes in a
-
Flee: In theapp.gameengine.model.ai.pacmanpackage, create a class namedFleewhich extendsDecision. This class will represent the decision of whether a ghost is fleeing from the player, which happens when a power pellet has been eaten, as well as the action of running from the player, which involves moving in a random direction at each intersection.-
Create a constructor which takes in a
Ghost, aPacmanGame, and aString. You should pass theGhostandStringto the super constructor, and store theGhostandPacmanGameas instance variables. -
You should create an additional
Vector2Dinstance variable to store the last whole-numbered location of the ghost. The initial value of this vector should be null. This will be used by several of the utilities provided, namely to ensure that the ghost does turn 180 degrees, and only changes directions when fully aligned to a tile. -
Override the
decidemethod to return whether the ghost is in the frightened state.-
You can call the
getStatemethod on aGhostto access its state. This method returns aStringrepresenting which of several states the ghost is in. -
If the state is exactly
"Frightened", then the ghost is fleeing, and this method should returntrue.
-
You can call the
-
Override the
doActionmethod. The behavior of this method is similar to but not exactly the same as that of theChaseclass. Take the following actions if thePacmanUtils.canActmethod returnstrue, passing in theGhostandVector2Dinstance variables and thedoubleparameter.-
Get the valid directions of movement for the ghost by calling the
PacmanUtils.getValidDirsmethod, again with the game's current level and the ghost. -
Find the actual direction of movement by calling the
PacmanUtils.getRandomDirectionmethod, passing in the valid directions. -
The
Vector2Dreturned bygetRandomDirectionmay be null. If so, skip this step. If it is not null, set the orientation of the ghost to the x and y components of that random direction. Again, you should use thesetOrientationmethod to do so. -
Set your
Vector2Dinstance variable equal to the rounded value of the ghost's location. You may callMath.roundon the individual components, or use theVector2D.roundmethod.
followPathmethod on the ghost object, passing in thedoubleparameter. You should do this even if thecanActmethod returnsfalse. -
Get the valid directions of movement for the ghost by calling the
-
Create a constructor which takes in a
Now you will create subclasses of the Decision class which implement behavior for the ghosts in
Pacman. You should look at the app.gameengine.utils.PacmanUtils class, as you will need to use
these methods within your Decision subclasses. You do not need to understand all of this code, and
the specific methods to use will be mentioned each time. If you did not already, download the missing method
canAct from here and add it to this class.
Though you do not need to understand the implementation of these methods, you should understand what they do. They each include a Javadoc comment that explains the purpose of the method, the parameters, and the return value. In IntelliJ, you can hover over the name of a method to read the Javadocs.
All of these classes will exist in the app.gameengine.model.ai.pacman package, which you should
create.
Remember that the Decision class has two main functionalities, the decide and
doAction methods. For some subclasses, only one of these will be implemented, and such classes will
only make sense in certain parts of the tree. For example, a subclass which stubs out the decide
method and actually implements the doAction method would only make sense as a leaf node.
Other decisions and actions are so closely related that it makes sense to include them within the same class. These classes could be placed anywhere within the tree, and in fact there will likely be duplicates, where one is used as the decision, and the other is used as the action.
-
Now that you have created the decision tree and the many decisions it will use, you can implement it into Pacman.
There are a couple of classes you need to modify and add to in order to achieve this.
-
Agent: Navigate the toapp.gameengine.model.gameobjects.Agentclass. EachAgentwill possess aDecisionTreeto determine and follow their behavior.-
Create an instance variable of type
DecisionTreewithin this class. It will initially be null. -
Create a getter and setter for this
DecisionTree, namedgetDecisionTreeandsetDecisionTreerespectively. -
Override the
updatemethod from the super class, which takes adoubleand aLevelas parameters and returnsvoid.- This method should first call the super update method, passing in the parameters as arguments.
-
If the
DecisionTreeinstance variable is notnull, call traverse on it. You should call the version of the method which does not take in aBinaryTreeNode. If theDecisionTreeis null, you do not need to do anything. -
If you added the code from the Task 2 CU for showing
Agentpaths, you may keep that here. You can place it before or after the new code.
-
Create an instance variable of type
-
Ghost: Navigate to theapp.games.pacman.Ghostclass. You will modify the constructor to give ghosts a decision tree matching classic pacman behavior. You can add this anywhere in the constructor.-
Recall that
GhostextendsEnemy, which extendsAgent, soGhosthas access to all of the methods in theAgentclass. -
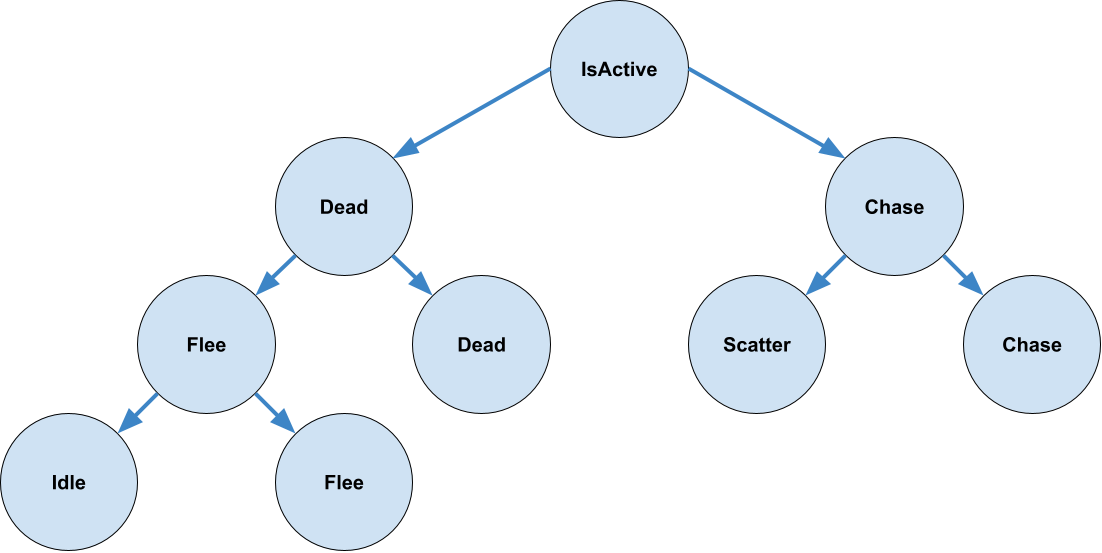
The structure of this decision tree is as follows. The root is an
IsActivenode.-
If the ghost is active (to the right), there is a
Chasenode, acting as a decision; if the ghost is in the chase state (to the right), there is anotherChasenode, this time acting as an action; if the ghost is not in the chase state (to the left), there is aScatternode. -
If the ghost is not active (to the left), there is a
Deadnode, acting as a decision; if the ghost is dead, there is anotherDeadnode, this time acting as an action; if the ghost is not dead, there is aFleenode, acting as a decision; from here, if the ghost is fleeing, there is anotherFleenode, this time acting as an action; if the ghost is not fleeing, there is anIdlenode. - The names of these decisions do not matter.
-
If the ghost is active (to the right), there is a
-
Refer to this image for a visual of the correct
DecisionTreestructure:
-
Recall that
You should now be able to play pacman and see the ghosts react dynamically to your actions. Every so often, on a timer, all of the ghosts will retreat (scatter) to the corners. If you eat a power pellet (the big ones), they will turn blue and start moving randomly. If you eat them they will return home, respawn, and begin chasing you again.
You may notice ghosts occasionally getting stuck on level geometry when moving around corners. That is an unfortunate amount of jankiness within the game engine at the moment, and does not signify any issues with your implementation.
-
The last features you will add for the Learning Objective are for an inventory system for the player. This is not
used in Pacman, so you should test this feature within the sample game. To play the sample game navigate to the
class
-
Collectible: Navigate to theapp.gameengine.model.gameobjects.Collectibleclass, which is an abstract class representing an object that can be picked up and used by the player. Currently this class contains very little, but you will add extra functionality by adding methods and extending this class.- The constructor takes four parameters, two of which are passed to the super constructor. Store the remaining parameters in instance variables.
-
Create a method named
getItemID(note the capital "ID"), which is a getter for the itemID instance variable. It should take no parameters and return aString. -
Create an abstract method named
use, which takes aLevelas a parameter and returnsvoid. This represents what occurs when theCollectibleis used in game by the player. -
Override the
collideWithDynamicObjectmethod, which takes oneDynamicGameObjectparameter and returnsvoid. If the dynamic object is the player, add this object to the player's inventory, and destroy this object.-
Remember that you can tell if any kind of
GameObjectis aPlayerobject by calling theisPlayermethod on it. -
You should add the object to the player's inventory with the
addInventoryItemmethod. This method likely does not exist yet. Read ahead to see the specification for that method. -
Since this method exists in the
Playerclass instead of theDynamicGameObjectclass, you cannot call it on the parameter. Instead, callgetPlayeron the game that you stored as an instance variable. -
You should destroy the object by calling the
destroymethod on it. This will remove it from the level, so that it is not rendered on the screen anymore and will not continue colliding with the player. - If the object is not the player, this method should do nothing.
-
Remember that you can tell if any kind of
-
AxePickup: navigate to theapp.games.commonobjects.AxePickupclass, which is a pickup that should allow the player to throw axe projectiles at enemies. Notice that this class extendsCollectible, and that the name passed to the super constructor is "Axe". Add the following functionality.-
Create an instance variable of type
Timer. Use theapp.gameengine.utils.Timerclass, not one of the built-in Java timers. In the constructor, assign this instance variable to a newTimerwith a cooldown of 0.25.-
The
Timerclass allows objects to limit how frequently they can use used. In this case, you will use the timer to limit how frequently axes can be thrown. You should look through the methods in this class, but do not need to fully understand them.
-
The
-
Create a getter for the
Timerinstance variable calledgetTimer, which takes no parameters and returns aTimer. -
Override and implement the
usemethod from theCollectibleclass. If the cooldown period on the timer is up, this method should make the player fire an axe projectile.-
To check if the timer cooldown has expired, use the
Timer.checkmethod on your instance variable. -
To fire a projectile, use the
Levelparameter and callgetPlayerto get thePlayerobject. On thisPlayer, callfireProjectile, which takes three arguments. The first argument is the projectile to fire, which should be a newPlayerAxeProjectileobject. The location of this projectile does not matter, as it will be set within thefireProjectilemethod. The second argument is the speed the projectile will be fired at, which should be set to exactly5. The third argument should be theLevelparameter.
-
To check if the timer cooldown has expired, use the
-
Override the
updatemethod, which has parameters of typedoubleandLevel, representing the time since the last update and the current level, respectively, and returnsvoid.- Call the super update method, passing the parameters as arguments.
-
Call
Timer.advanceon theTimerinstance variable, passing in thedoubleparameterdt. This will ensure that the cooldown actually decreases and the pickup can be used.
-
Create an instance variable of type
-
MagicPickup: Navigate to theapp.games.commonobjects.MagicPickupclass, which is a pickup that should allow the player to fire magic projectiles at enemies. Notice that this class extendsCollectible, and that the name passed to the super constructor is "Magic". You should create the same instance variables and methods as in theAxePickupclass. The only difference should be that in theusemethod, when callingfireProjectile, you should pass in aPlayerMagicProjectileobject, and a speed of10. -
PotionPickup: Navigate to theapp.games.commonobjects.PotionPickupclass, which is a pickup that should allow the player to regain some health when used. Notice that this class extendsCollectible, and that the name passed to the super constructor is "Health Potion". Add the following functionality.-
Create an instance variable of type
int, and in the constructor, assign this instance variable to the constructor parameter "heal". This is the amount that the potion will heal the player by. -
Create a getter for for this instance variable called
getHealAmount, which takes no parameters and returns anint. -
Override and implement the
usemethod from theCollectibleclass. Increase the health of the player by the heal instance variable, and remove the potion from the player's inventory.-
To get the player, you can call the
getPlayermethod on theLevelparameter. -
To access and modify the health of the player, you can use the
getHPandsetHPmethods respectively. -
To remove the item from the player's inventory, you should call the
removeActiveItemmethod. This method likely does not exist yet. Read ahead to see the specification for that method.
-
To get the player, you can call the
- You do not need to override the update method, as this class does not possess a timer to increment.
-
Create an instance variable of type
app.Configuration and change the GAME constant to "sample game".
Some of the methods in the
Player class that are referenced here do not exist yet. You may want to
implement those methods first, or along with these classes and methods.
-
Now you will add methods for using and manipulating the player's inventory. In the
-
addInventoryItem: Create a method namedaddInventoryItemthat takes in aCollectibleand returnsvoid. This method should add the object from the parameter to thePlayer's inventory.- Adding an item should never change the currently active item, except for when you pick up your first item
- This new object will be considered the "last" item in the list.
-
removeActiveItem: Add a method namedremoveActiveItemwhich takes no parameters and returnsvoid. This method should remove whatever the currently active item is from thePlayer's inventory.- Once the currently active item is removed, the currently active item should become whatever was next in the inventory. For example, if you collected an Axe, then Magic, then a Health Potion, the currently active item would be the Axe. If this method is called, the remaining items are the Magic and the Health Potion, and the active item would be the Magic.
- If the item removed is the last item in the inventory (ie. the one most recently added), the active item would become the first item in the inventory (ie. the one least recently added). Be sure to account for this looping behavior in your code.
-
getActiveItem: Add a method namedgetActiveItemthat takes no parameters and returns aCollectible. This method should return whicheverCollectiblein the inventory is active.- If the inventory is empty, this method should return null.
- If an item is collected and the inventory was previously empty, that item should be the active item.
-
getActiveItemID: Add a method calledgetActiveItemID(note the capital "ID") that takes in no parameters and returns aString.-
This method should return the ID of the active
Collectiblefrom the inventory, by calling theCollectible.getItemIDmethod on it. -
If the inventory is empty, this method should return the exact
String"No item equipped".
-
This method should return the ID of the active
-
cycleInventory: Add a method calledcycleInventorythat takes no parameters and returnsvoid. This method will cycle through the inventory, changing the item currently marked as active.- This should be done in the order the objects are collected. For example, if a player collected an Axe, then Magic, then a Potion, the first call to cycleInventory will change the active item from the Axe to Magic. The second call to cycleInventory will change the active item from Magic to the Potion.
- Once cycleInventory is called while the most recently collected item is active, the active item should be set back to the front of the inventory, to the least recently collected item. Thus in our previous example, the third call to cycleInventory will change the active item from the Potion to the Axe.
-
clearInventory: Add a method calledclearInventorythat takes no parameters and returnsvoid. This method will reset the inventory to its initial state, which should be empty. -
update: The update method already exists in this class. Add code which iterates over every item in the inventory and calls theupdatemethod on it, passing in both parameters.- The order in which these objects are updated does not matter, as long as each object is updated once.
- Note that since these methods are the only way the inventory can be accessed and none of them rely on a specific data structure, however you choose to represent the inventory internally does not matter so long as your implementation follows the expected behavior. The only requirements are that you are able to keep track of every item that is added and the object that is currently active.
- The inventory should initially be empty.
app.gameengine.model.gameobjects package, make the following additions to the
Player class to implement a functioning inventory system. Some of these methods will already exist, and
you should just modify them. Others you will have to create.
-
You also need to implement the ability to use objects, which will occur in the
-
actionButtonPressed: In theLevelclass, implement theactionButtonPressedmethod. The signature for this method already exists, you should simply add functionality to it.-
This method should call the
getActiveItemmethod on the level's player to access the currently equippedCollectible. If there is an item equipped (ie. it is not null), this method should call theusemethod on that item, passing inthisas the argument. -
You can access the
Playerfor a level by calling thegetPlayermethod.
You can cycle your character's inventory in-game with the tab key. Pressing the space bar will call the
-
This method should call the
app.gameengine.Level
class.
Level.actionButtonPressed method, allowing you to use the active item to fire projectiles or use
potions.
-
The final features you will add are modifications to the
-
readStaticObject: Modify this method so that it can recognize and return the following objects.-
Add a case for
AxePickupobjects. If the string being checked is "AxePickup", a newAxePickupobject should be returned. TheAxePickupconstructor takes twodoubles and aGame. Thedoubles should be the variablesxandy, and theGameshould be the parametergame, all of which already exist in this method. -
Add a case for
MagicPickupobjects. If the string being checked is "MagicPickup", a newMagicPickupobject should be returned. TheMagicPickupconstructor takes twodoubles and aGame. Thedoubles should be the variablesxandy, and theGameshould be the parametergame, all of which already exist in this method. -
Add a case for
PotionPickupobjects. If the string being checked is "PotionPickup", a newPotionPickupobject should be returned. ThePotionPickupconstructor takes twodoubles, anint, and aGame. Thedoubles should be the variablesxandy, and theGameshould be the parametergame, all of which already exist in this method. Theintshould be the amount to heal, which is the fifth value in the line. Refer to the example above, where the amount to heal would be 50.
-
Add a case for
LevelParser class so that the kinds of
collectibles can be parsed. The sample game already contains an AxePickup and a
MagicPickup in a couple of the levels. If you want to use the PotionPickup in game, you
can add it to one of the levels. An example of this would be adding this line to one of the level csv files:
"StaticGameObject,PotionPickup,13,13,50".
You can also create levels with the level editor which contain these objects.
Testing Utility
In the app.tests package, create a class called TestDecision, which extends the
Decision class. This class will be used to help you test by simplifying the behavior of the
decide and doAction methods. Specifically, we want the behavior of these methods to not
depend on the actual state of the game, so that you can test the DecisionTree methods without setting
complex properties of the game, player, and ghosts.
The constuctor should take an Agent, a String, and a boolean. The first two
parameters can be passed to the super constuctor, and the last should be stored as an instance variable. This
boolean will be the value returned by decide, so it will decide which direction the traversal
progresses.
You should create another boolean instance variable representing whether the TestDecision
has been used. It should initially be false.
Create a method called isUsed, which takes no parameters and returns a boolean. It should return the
instance variable described above.
Override the decide method to return the instance variable for the traversal direction.
Override the doAction method to set the instance variable for whether it has been used to
true.
Testing Requirements
Write JUnit tests for the following methods from the specification in the TestTask3 class. These tests
should be annotated with @Test.
-
DecisionTree:-
To test these methods, you will have to create
Decisionobjects to populate theDecisionTree. You are highly encouraged to use yourTestDecisionclass. -
You must test BOTH of the
traversemethods in this class. -
Test that the overload which takes a
BinaryTreeNodereturns the properDecision, or null, with a variety of trees. -
Test that the other method calls
doActionon the correctDecisionnode, and only on that node.
-
To test these methods, you will have to create
-
Player:-
addInventoryItemandcycleInventory:-
Write tests to ensure that adding items to the inventory has the proper behavior when cycling
through the inventory, i.e. calling
cycleInventorywill go through every addedCollectibleand wrap around to the beginning.
-
Write tests to ensure that adding items to the inventory has the proper behavior when cycling
through the inventory, i.e. calling
-
removeActiveItem:-
Write tests to ensure that calling
removeActiveItemproperly removes the active item from the inventory and sets the new active item.
-
Write tests to ensure that calling
- When testing these methods, you only need to check that the item IDs match the expected.
-
- You DO NOT need to write tests for any of the remaining classes or methods. Tests have been provided for some of these as described in the overview section above.
Programming Requirements
Implement the methods from the specification. You may wish to complete the Testing Requirements before you begin implementation, and it's suggested that you run these tests as you implement the methods.
Autolab Feedback
Feedback for the Learning Objective component of the Game Features will be given in several phases. If you don't complete a phase, then feedback for the following phase(s) will not be given. You must complete all the following phases to earn the required score of 30 LOs to complete this task. The phases for the Learning Objective are as follows:
-
Testing your testing utility method
- Your testing utility method will be checked with a variety of test cases to ensure that it makes all the required checks. This phase will ensure that your utility method is accurate before you start using it in your tests.
-
Running your tests on a correct solution
- Your tests will be run against a solution that is known to be correct. If your tests do not pass this correct solution, there is an error somewhere in your tests that must be fixed before you can move on with the assignment. If your tests don't get past this check, you should re-read this document and make sure you implemented your tests and code according the specification. You should also make sure that if there are multiple correct outputs to the input in your tests cases that you accept any of the outputs as correct.
-
Checking your tests for feature coverage
- The next phase is to check if your tests check for a variety of features defined by different inputs. You should write at least one test case for each feature to pass this phase.
- Passing this phase does not necessarily mean that your testing is completely thorough. Satisfying Autolab is the bare minimum testing requirement. Not all possible inputs are checked and it is sometimes possible to pass this phase with weak testing. If you are struggling to earn credit for code that you believe is correct, you should write more than the required tests.
-
Running my tests on your solution
- Once Autolab is happy with your tests, it will run my tests against your code to check it for correctness. If your testing is thorough, and your code passes your tests, then you should pass this phase. If you pass your tests, but fail one of mine, it is an indicator that you should write more tests to help expose your bug.
Once you have successfully passed all four phases, you will have completed the Learning Objective component of the Game Features, and Autolab will confirm this with a score of 30 LOs.
Overview
For the Comprehensive Understanding portion of this task, you will implement functionality in the
app.gameengine.statistics.Scoreboard class, and several classes that you will create in the
app.gameengine.model.datastructures package, in order to create a functional scoreboard for several of
the games. At the moment, the only games with scoreboards are Minesweeper and Pacman. Each of these games adds a
score to the scoreboard whenever you win a game.
Each of the classes and methods you implement will have an associated CU count that you will earn upon passing our tests for that method. Partially implemented methods may result in some partial credit being earned, depending on the method.
Programming Requirements
-
Comparators (5 CUs each, 15 total)
-
For these classes and methods, you will need to use the
app.gameengine.statistics.GameStateclass. It is a small, simple class, so you should look at and understand this class. -
Navigate to the
app.gameengine.model.datastructures.Comparatorclass. Currently, this is a concrete class with a stubbed out method calledcompare. Modify this class such that it is an interface instead of a class, and make this method abstract. Do not modify the rest of the method signature. This is not worth any CUs on its own, but is required for the rest of the comparator classes.-
This will result in a compilation error in the
Scoreboardclass, which tries to instantiate aComparator. You can fix this by changing this to be any of the classes which implement theComparatorbelow, or by removing this constructor entirely. If you remove the constructor, you should call the other constructor from within theGameclass when creating the scoreboard instance variable. Any of these solutions are fine, and we won't test this constructor, or the default comparator.
-
This will result in a compilation error in the
-
LevelNameComparator: In theapp.gameengine.model.datastructurespackage, create a class namedLevelNameComparator. This should implement theComparator<GameStat>.-
Override the
comparemethod to compare twoGameStatobjects based on their entry names. If the first name is lexicographically less than the second, this method should returntrue, and it should returnfalsein all other cases. -
You may find the
String.compareTomethod useful for performing this comparison. -
If the two names are equivalent, this method should return
false, since aStringcannot be lexicographically less than itself.
-
Override the
-
PlaytimeComparator: In theapp.gameengine.model.datastructurespackage, create a class namedPlaytimeComparator. This should implement theComparator<GameStat>.-
Override the
comparemethod to compare twoGameStatobjects based on their playtimes. If the first playtime is less than the second, this method should returntrue, and it should returnfalsein all other cases. - This method should break ties by returning
false.
-
Override the
-
ScoreComparator: In theapp.gameengine.model.datastructurespackage, create a class namedScoreComparator. This should implement theComparator<GameStat>.-
Override the
comparemethod to compare twoGameStatobjects based on their scores. If the first score is greater than the second, this method should returntrue, and it should returnfalsein all other cases. - This method should break ties by returning
false.
-
Override the
-
For these classes and methods, you will need to use the
-
Scoreboard basics (5 CUs)
-
Navigate to the
app.gameengine.statistics.Scoreboardclass. Modify the constructor which takes two parameters so that theComparatoris stored as an instance variable. -
Create getters and setters for this comparator instance variable, named
getComparatorandsetComparatorrespectively. -
Create an instance variable that is a
BinaryTreeNodeofGameStats. This will act as a BST to store and sort the scores in a game according to the comparator. -
Create getters and setters for this instance variable named
getScoreTreeandsetScoreTree, respectively. -
Complete the existing
addScoremethod to add the inputGameStatto the correct location in the tree, according to the comparator.-
Although the comparator could potentially change during the game, invalidating the sorting of
your tree, your code does not need to handle this case. You can assume that the
setComparatormethod will only ever be called before any scores are added.
-
Although the comparator could potentially change during the game, invalidating the sorting of
your tree, your code does not need to handle this case. You can assume that the
-
Navigate to the
-
Scoreboard
loadStatsmethod (5 CUs)-
Complete the existing
loadStatsmethod to load the existing stats from previous games. This will ensure that high scores carry carry over when the game is closed and restarted. Note that this method requires a functioning implementation of theaddScoremethod. -
The existing
statsPathinstance variable will be the location of the csv file which stores the stats. Each csv file will have one score per line, as "entryName,playTime,score", which are aStringand twodoubles, respectively. You should read each line in this file, parse it to create aGameStatobject corresponding to that line, and add it to the tree using theaddScoremethod. - This process must only occur once for a given scoreboard. If this method is called more than once, every following call should do nothing.
-
Complete the existing
-
Scoreboard
getScoreListmethods (25 CUs)-
Complete the existing
getScoreListmethod to return aLinkedListNodethat is the head of a sorted list containing every element in the tree, according to the comparator. - If the tree is null, meaning that no scores have been added, this method should return null.
-
Create an overloaded method for
getScoreListwhich takes aBinaryTreeNodeofGameStatas a parameter and returns aLinkedListNodethat is the head of a sorted list containing every element in the input tree. - This method may assume that the input tree is a valid BST according to the class' comparator.
- If the input tree is null, this method should return null.
-
Complete the existing
- Now, when you complete a game of Minesweeper or Pacman, you should see an entry added to the scoreboard, which is accessible from the pause menu, reached by pressing the escape key. The easiest way to test this is by playing Minesweeper, and pressing escape before selecting a difficulty. This will default to the trivial difficulty, which only has 3 mines and should be quite easy (as long as you understand the rules of Minesweeper).
-
If you wish to add a scoreboard to other games, like snake, you can do so, but this is optional. There are a few
adjustments you need to make in order for this to work. First, in the
SnakeGameconstructor, you should set the comparator to the desired metric. You must then choose a place to add a score to the scoreboard. It would likely make the most sense to add this in both theadvanceLevelandresetCurrentLevelmethods, so that both winning and losing the game save the score. In either case, you can use thegetScoreboardmethod to get the scoreboard, and then add a newGameStatentry. You can use thegetScoreandgetPlaytimemethods of theLevelclass to create theGameState.
Autolab Feedback
The Comprehensive Understanding tests will unlock once you have earned 30 LOs on the assignment. These will be run in a single phase for correctness. For each feature you successfully pass, you will earn a varying amount of CUs with a total maximum score of 50 CUs.
There is no required testing component for the Comprehensive Understanding; however, you are expected to test your code nonetheless as the Autolab feedback is unlikely to be sufficient for debugging.