Coding Task 1
Unit Testing and Classes
Coding Task 1 Overview
As with the previous and future tasks, there are two components to this task.
To reiterate, both the Problem Set and Game Features - Learning Objective portions of this document MUST be completed to achieve the Learning Objective points and pass the course. The Game Features - Comprehensive Understanding is not needed for the Learning Objective requirement, but completing/not completing it will directly impact your grade through CU points. Each Problem Set will carry 20 LO points, while each Game Engine Task will carry 30 LO points and 50 CU points.
You should complete the components below in the order they are listed; you will not be able to earn credit for the following component(s) until you complete the previous ones with all available points.
Coding Task 1 assesses Unit Testing and Classes. Both the Problem Set and Game Engine Task will focus on these topics.
The content of the Learning Objective is primarily used in the Game Engine by the sample game. To play the sample
game, during and after completing this Learning Objective, navigate to the class app.Configuration and
change GAME to "sample game".
As with the previous task, one of our TAs has prepared a video which covers the requirements for this task. Again, this content is optional, but we strongly recommend watching the video to get started, especially if you're struggling with the game features. The video can be found at https://www.youtube.com/watch?v=XVykxZlLLHM.
Overview
Problem Set GitHub Repository link: https://github.com/CSE-116/ProblemSet-1
- Clone the starter code from the repository linked above into a new IntelliJ project
- Make sure the src folder is marked as the source root (Right-click the src folder, choose “mark directory as” and choose sources root)
Once you have the project opened in IntelliJ, you'll see a src folder containing 2 Java packages named problem and tests.
To submit your project, run problem.Zipper, which will create a zip file containing the problem set,
and submit it to Autolab.
Specification
You should read through all the following sections before you begin to implement the methods from the specification. Note that you will not receive feedback on the correctness of these methods until you've completed the testing component of this task (see the "Autolab Feedback" section for more details). However, you must at least create every class/method from this specification to receive feedback. You can "stub out" these methods by having them always return a fixed value, but they must exist so the grading code, and your tests, can compile and run.
For this Problem Set, you will implement the following functionality. Note that all of the methods are non-static.
-
Location: Create a class in theproblempackage namedLocation. This class will represent a 2-dimensional point representing the location of a shape. This class should implement the following methods:-
Constructor: create a constructor which takes two
doubles representing the x and y location, respectively. -
getX: create a method namedgetXwhich takes no arguments and returns adouble. This method should return the x location. -
getY: create a method namedgetYwhich takes no arguments and returns adouble. This method should return the y location. -
setX: create a method namedsetXwhich takes a singledoubleand returnsvoid. This method should set the x component of the location to the input amount. -
setY: create a method namedsetYwhich takes a singledoubleand returnsvoid. This method should set the y component of the location to the input amount.
-
Constructor: create a constructor which takes two
-
Circle: Create a class in theproblempackage namedCircle. This class will represent a circle based on a 2-dimensional location and a radius. This class should implement the following methods:-
Constructor: create a constructor which takes a (reference to a)
Locationobject and adouble, in that order. These represent the location of the circle and its radius. -
getRadius: create a method namedgetRadiuswhich takes no arguments and returns adouble. This method should return the radius of the circle. -
setRadius: create a method namedsetRadiuswhich takes a singledoubleand returnsvoid. This method should set the radius of the circle to the input value. -
getLocation: create a method namedgetLocationwhich takes no arguments and returns a (reference to a)Locationobject. This method should return the location of the circle. -
setLocation: create a method namedsetLocationwhich takes a single (reference to a)Locationobject and returnsvoid. This method should set the location of the circle to the input value. -
getArea: create a method namedgetAreawhich takes no arguments and returns adouble. This method should calculate and return the area of the circle. -
Remember that the area of a circle can be found with
πr2, whereris the radius of the circle. -
You can use
Math.PIas the value of π. Nothing needs to be imported to do so.
-
Constructor: create a constructor which takes a (reference to a)
-
CircleEngine: Create a class in theproblempackage namedCircleEngine. This class will contain methods for using and manipulatingCircles. This class should implement the following methods:-
detectCollision: create a method nameddetectCollisionwhich takes two (references to)Circleobjects and returns a boolean. It will return true if the circles are overlapping and false otherwise.- If two circles are exactly sharing an edge (or point) but not overlapping, this should not be considered a collision.
-
The distance between two arbitrary points can be calculated as
√((x1-x2)2 + (y1-y2)2).
-
doubleRadius: create a method nameddoubleRadiuswhich takes anArrayListofCircles and returnsvoid. This method should iterate over the input list and double the radius of each circle, using the appropriate setter.
-
Testing Requirements
Write JUnit tests for the following methods from the specification in the tests.TestProblemSet1 class.
These tests should be annotated with @Test.
-
Location-
Write tests for the constructor, getters, and setters. These tests should ensure that you can properly
access and modify the x and y location of a
Locationobject.
-
Write tests for the constructor, getters, and setters. These tests should ensure that you can properly
access and modify the x and y location of a
-
Circle-
Write tests for the constructor, getters, and setters. These tests should ensure that you can properly
access and modify the location and radius of a
Circleobject. -
Write tests for the
getAreamethod, asserting that the calculating is correcly performed on circles of varying radii.
-
Write tests for the constructor, getters, and setters. These tests should ensure that you can properly
access and modify the location and radius of a
-
CircleEngine-
You DO NOT need to test the methods in this class. Tests for these methods are provided for you in the
TestProblemSet1class. They are likely commented out, and must be uncommented for you to use them. You can uncomment multiple lines by selecting the lines and pressing ctrl+/ (command+/ on mac). You are encouraged to use these tests to help you write the methods they are testing.
-
You DO NOT need to test the methods in this class. Tests for these methods are provided for you in the
Programming Requirements
Implement the methods from the specification. You may wish to complete the Testing Requirements before you begin implementation, and it's suggested that you run these tests as you implement the methods.
Autolab Feedback
Feedback from Autolab will be given in several phases. If you don't complete a phase, then feedback for the following phase(s) will not be given. You must complete all phases to earn the required score of 20 LOs. For the problem set, the phases will be as follows:
-
Running your tests on a correct solution
- Your tests will be run against a solution that is known to be correct. If your tests do not pass this correct solution, there is an error somewhere in your tests that must be fixed before you can move on with the assignment. If your tests don't get past this check, you should re-read this document and make sure you implemented your tests and code according the specification. You should also make sure that if there are multiple correct outputs to the input in your tests cases that you accept any of the outputs as correct.
-
Checking your tests for feature coverage
- The next phase is to check if your tests check for a variety of features defined by different inputs. You should write at least one test case for each feature to pass this phase.
- Passing this phase does not necessarily mean that your testing is completely thorough. Satisfying Autolab is the bare minimum testing requirement. Not all possible inputs are checked and it is sometimes possible to pass this phase with weak testing. If you are struggling to earn credit for code that you believe is correct, you should write more than the required tests
-
Running my tests on your solution
- Once Autolab is happy with your tests, it will run my tests against your code to check it for correctness. If your testing is thorough, and your code passes your tests, then you should pass this phase. If you pass your tests, but fail one of mine, it is an indicator that you should write more tests to help expose your bug.
Once you have successfully completed all three phases, you will have completed this Problem Set and Autolab will confirm this with a score of 20 LOs.
Overview
You will continue to build functionality for the Game Engine in this component of the task. This will be done on top of the code written for the previous task; you should not reclone or remove said code for this task or any future Game Features components.
As with the previous task, there are two parts to the Game Features component: the Learning Objective and Comprehensive Understanding. The Learning Objective portion must be completed with a score of 30 LOs before the Comprehensive Understanding unlocks. Both portions of the Game Features will be submitted to the same assignment on Autolab.
For this Learning Objective portion, you will be writing code in the following classes which already exist:
-
PhysicsEngine, located in theapp.gameengine.model.physicspackage. -
Wall, located in theapp.games.commonobjectspackage. -
TestTask1, located in theapp.testspackage.
If you do not have the TestTask1 class in your app.tests package, you should create it. We
have provided some tests for the Wall class for you, which can be accessed at this link:
TestTask1.java.
If you already have the TestTask1 class, you already have these tests and do not need to add them to
the file.
Additionally, in the app.tests package, create a new class called TestUtils.
The Game Engine
In this task, you will continue to add feature to the game engine project that you started in the previous task.
The Coordinate System
The coordinate system use for computer graphics might be different than you're used to. We'll use the standard coordinate system that is typically used in video games (and anything involving rendering to a screen).
The origin of the system is at the top-left of the screen/window/level with positive x going right and positive y going down. This image shows the same information as the one above, but with the coordinate system labeling all the tiles in the game. You can see that "G" (The goal) is at location (6, 2).
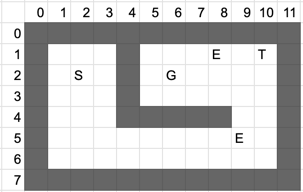
Each object within the game has several important properties to consider, namely a location and a hitbox, which has its own location and dimensions. These quantities are each represented as 2-dimensional vectors (x, y). All objects and hitboxes are rectangles, and their location is the location of their upper left corner. Their dimensions are the width and height of the rectangle. For example, the goal (G on the grid above) has a location of (6, 2), since that's the location of its upper-left corner, and it has dimensions (1, 1) since it's exactly 1 tile in size. Locations and dimensions do not have to be whole numbers.

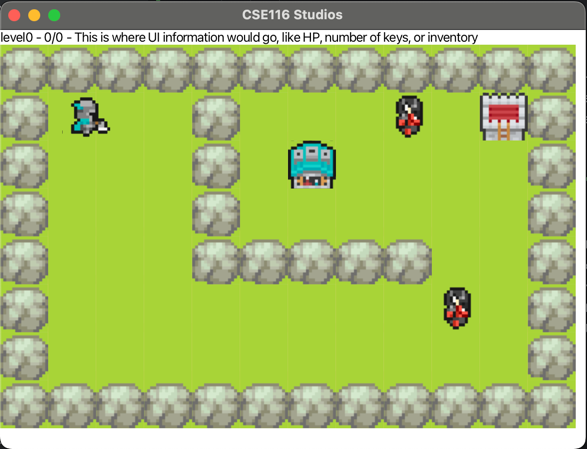
Object locations and dimensions also do not necessarily have to be aligned with the visuals of that object. In the image above, the green dot represents the location of that object, the blue outline represents the size of the sprite image that is being rendered for that object, and the red outline represents the size of its hitbox. Having a hitbox smaller than the graphical sprite allows for more precise physics and collision, but means that extra care has to be taken when dealing with those properties. Pressing F4 in game shows overlays of each object's hitbox, which can be helpful for debugging.
Specification
You should read through all the following sections before you begin to implement the methods from the specification. Note that you will not receive feedback on the correctness of these methods until you've completed the testing component of this task (see the "Autolab Feedback" section for more details). However, you must at least create every class/method from this specification to receive feedback. You can "stub out" these methods by having them always return a fixed value, but they must exist so the grading code, and your tests, can compile and run.
For the Learning Objective portion of the Game Features component for this task, you will implement the following functionality:
Note: It is suggested that you follow this specification in order for your implementation. However, you may
find it easier to complete the detectCollision method before the getOverlap
method.
-
Implement the following methods in the
PhysicsEngineclass:-
updateObject-
Complete the given
updateObjectmethod. This method should update the location of theDynamicGameObjectbased on the velocity and amount of elapsed time. -
You should use the respective getters and setters in the
DynamicGameObjectclass to achieve this functionality, namelygetVelocity,getLocation, andsetLocation. These methods are already provided for you. -
Note that change in position for each direction can be calculated as the product of that
direction's velocity and the change in time. You can access the X and Y components of the
velocity (and any other vector) using the
getXandgetYmethods on theVector2Dobject returned bygetVelocity.
-
Complete the given
-
getOverlap-
Complete the given
getOverlapmethod. This method should return adoublerepresenting the minimum overlapping distance of the twoHitboxobjects from the parameters. -
To be precise, consider that one hitbox must be moved in one of the four cardinal directions
(up, down, left, or right) such that the two hitboxes are no longer overlapping. The distance
returned by this method should be the smallest of those four distances. This is very similar to
the logic for the
Wall.collideWithDynamicObjectmethod, so referring to those descriptions and images may be helpful. -
While you do not need to fully understand the exact implementation of the
Hitbox, note the following:-
You can access the coordinates of the top-left location of the
Hitboxusing thegetLocationmethod, which returns aVector2Dcontaining the x and y coordinate of said location. -
You can access the size of the
Hitboxusing thegetDimensionsmethod, which returns aVector2Dcontaining the width (in the x-component) and height (in the y-component) of the Hitbox. - With this information, you are able to calculate the location of all four corners of the Hitbox.
-
You can access the coordinates of the top-left location of the
-
The double that you return should be the minimum overlapping distance of the two
Hitboxobjects. This means you must calculate the amount the two hitboxes are overlapping in both the x and y direction, then return the smaller of the two. -
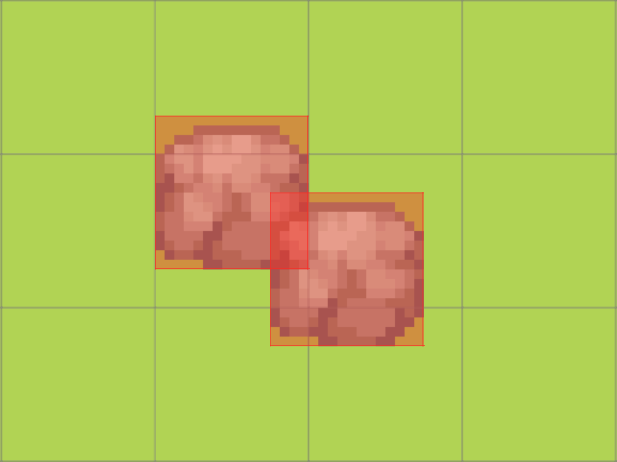
In this example, the Walls are overlapping by 0.25 in the x-direction and 0.5 in the y-direction. CallinggetOverlapon these Walls' hitboxes would return 0.25. - You are provided tests for this method, and it is suggested you run them as you complete your implementation. It is also suggested that you sketch out the logic for this method before you start writing code.
- If the two hitboxes are not overlapping at all, this method must return a number less than or equal to 0. The specific number is not important, as the value is only significant if the hitboxes are overlapping.
-
Complete the given
-
detectCollision-
Complete the given
detectCollisionmethod. This method should return abooleanthat is true if the two Hitboxes are colliding and false otherwise. - Two hitboxes are considered colliding if they are overlapping by some amount strictly greater than 0. That is, if they just share an edge, that is not considered a collision.
-
All the Hitbox information from
getOverlapapplies here as well. In the same example, callingdetectCollisionon those two Walls would return true, as they are colliding by 0.25 which is greater than 0.
-
Complete the given
-
-
Implement the following method in the
Wallclass:-
collideWithDynamicObject-
Complete the given
collideWithDynamicObjectmethod. This method should adjust the location of theDynamicGameObjectpassed in the parameter to ensure that they are no longer overlapping, and zero the velocity in that direction. - This adjustment should be made based on whichever direction has the least amount of overlap.
-
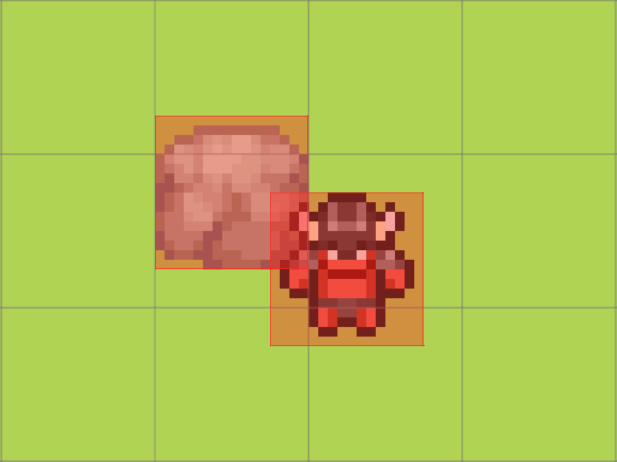
In this example, the Demon's position would be incremented by 0.25 in the x-direction and the y position would stay the same. This would place the Demon directly next to the Wall's right side. It's velocity in the x-direction would be set to 0, and it's velocity in the y-direction would be unchanged. -
This method should only modify the location and velocity of the
DynamicGameObject. All state in theWallshould stay the same. -
Determining the overlap for this method is done in the same fashion as the
PhysicsEngine.getOverlapmethod. Thus, you should calculate the overlap based on theWall's andDynamicGameObject's hitboxes, which can be obtained with thegetHitboxmethod. You should be able to reuse much of the same logic for this method. -
When you update the object's position, you should do so based on the object's actual location
rather than its hitbox's location (e.g. if you need to move the object 0.5 to the left, you
would call
setLocationwithotherObject.getLocation().getX() - 0.5rather thanotherObject.getHitbox().getLocation().getX() - 0.5. Note that this is only for the position update, and you should still use the hitbox's position to calculate the amount to move). - You are provided tests for this method that you should run throughout your implementation. Refer to the "Overview" section in the "Game Features - Learning Objective" card if you are missing these tests.
-
Complete the given
-
Testing Utility
When working with more complex structures such as classes and data structures, it can be tedious to constantly compare two such instances as is often necessary in testing. Thus, the Learning Objective component will typically begin with writing a Testing Utility method relevant to the task. Writing this method is required to pass the Learning Objective, and it is strongly encouraged that you use this method in your testing.
In the app.tests.TestUtils class, create a static method named
comparePlayers
that takes in (references to) two Players and returns void. This method should contain JUnit asserts
that verify the two Players passed in have identical state, failing if they do not.
Specifically, you must assert that the location and velocity vectors of both objects are equal. You should use the
respective getters to access these instance variables. However, you will not find these getters in the
Player class, rather they will be contained in the
DynamicGameObject
class in the app.gameengine.model.gameobjects package. This is because Player
extends DynamicGameObject and thus has access to all of these methods. This is called
inheritance, and more details on inheritance will come later in this course.
Note that this method is not a test, and thus should not have the @Test annotation. Rather, this is a
static method intended to be used in your testing.
Testing Requirements
Write JUnit tests for the following methods from the specification in the TestTask1 class. These tests
should be annotated with @Test:
-
PhysicsEngine- To test these methods, you will have to create a PhysicsEngine object in order to call the methods
-
updateObject- To test this method: create a Player object, set the x, y of its location and velocity to known values, call updateObject with the player and a dt of your choice, do the math to compute the expected x and y for the player location after the update and assert that the actual x and y match this expectation.
- You can pass in Player objects into this method even though it takes in DynamicGameObjects. You will have to do this as you cannot directly instantiate a DynamicGameObject as it is an abstract class. More on this topic will be discussed in the future.
-
You may find it easier to create two
Playerobjects, one whose location and velocity you manually update, and one that is updated by theupdateObjectmethod. This way, you can make use of thecomparePlayersmethod.
-
detectCollision- To test this method, you can create multiple hitbox objects with different locations and dimensions. You should manually calculate if these two hitboxes are overlapping and assert that the method returns true or false as appropriate.
- Note that Hitbox has two constructors. It is sufficient to test this method only using Hitboxes that use the constructor with two parameters: location and dimension. The other constructor takes in a third parameter for offset which you do not need to use.
-
getOverlap-
You DO NOT need to test the
getOverlapmethod. Tests are provided for you in theTestTask1class, which you may use to help you write the method itself.
-
You DO NOT need to test the
-
Wall-
You DO NOT need to test the
collideWithDynamicObjectmethod. Tests are provided for you in theTestTask1class, which you may use to help you write the method itself.
-
You DO NOT need to test the
Programming Requirements
Implement the methods from the specification. You may wish to complete the Testing Requirements before you begin implementation, and it's suggested that you run these tests as you implement the methods.
Autolab Feedback
Feedback for the Learning Objective component of the Game Features will be given in several phases. If you don't complete a phase, then feedback for the following phase(s) will not be given. You must complete all the following phases to earn the required score of 30 LOs to complete this task. The phases for the Learning Objective are as follows:
-
Testing your testing utility method
- Your testing utility method will be checked with a variety of test cases to ensure that it makes all the required checks. This phase will ensure that your utility method is accurate before you start using it in your tests.
-
Running your tests on a correct solution
- Your tests will be run against a solution that is known to be correct. If your tests do not pass this correct solution, there is an error somewhere in your tests that must be fixed before you can move on with the assignment. If your tests don't get past this check, you should re-read this document and make sure you implemented your tests and code according the specification. You should also make sure that if there are multiple correct outputs to the input in your tests cases that you accept any of the outputs as correct.
-
Checking your tests for feature coverage
- The next phase is to check if your tests check for a variety of features defined by different inputs. You should write at least one test case for each feature to pass this phase.
- Passing this phase does not necessarily mean that your testing is completely thorough. Satisfying Autolab is the bare minimum testing requirement. Not all possible inputs are checked and it is sometimes possible to pass this phase with weak testing. If you are struggling to earn credit for code that you believe is correct, you should write more than the required tests.
-
Running my tests on your solution
- Once Autolab is happy with your tests, it will run my tests against your code to check it for correctness. If your testing is thorough, and your code passes your tests, then you should pass this phase. If you pass your tests, but fail one of mine, it is an indicator that you should write more tests to help expose your bug.
Once you have successfully passed all four phases, you will have completed the Learning Objective component of the Game Features, and Autolab will confirm this with a score of 30 LOs.
Overview
For the Comprehensive Understanding portion of this task, you will be implementing functionality in the
SnakeLevel class (from the app.games.snake package) such that the Snake game is fully
functional. You can access the Snake game by changing the GAME constant in
app.Configuration to "Snake".
Each of the methods you implement will have an associated CU count that you will earn upon passing our tests for that method. Partially implemented methods may result in some partial credit being earned, depending on the method.
You don't need to understand all of the internal Snake code; however, you should expect to read and understand some of the internal Javadoc comments while completing this task. Not all background information will be provided in this document.
Programming Requirements
In the
SnakeLevel class, implement the following methods:
-
wallOffBoundary(10 CUs)-
When this method is called, it will surround the level with
SnakeWallobjects. - These walls should each be aligned to a single, whole-numbered tile.
-
These walls should surround the level. The level consists of the space between (inclusive) [0,
width-1] in the x-direction, [0, height-1] in the y-direction.
- For example, a 2x2 level's top wall will span from (-1, -1) to (2, -1)
-
All four sides of the level should be surrounded by
SnakeWalls. Adding aSnakeWallto the level can be done by accessing and modifying the ArrayList containing the level'sStaticGameObjects, just as it is done in theLevelParserclass. - You may find it helpful to draw out examples to determine where these walls should lie.
-
When this method is called, it will surround the level with
-
spawnFood(10 CUs)-
When this method is called, one
SnakeFoodshould be added to the level'sStaticGameObjectsArrayList, as well as the ArrayList namedfoodin theSnakeLevelclass. -
The location of this
SnakeFoodshould be at a random tile-aligned coordinate, with the following restrictions:-
It cannot be spawned anywhere a
SnakeBodyobject from thetailArrayList is currently occupying. - It cannot be spawned at the player's location.
-
It cannot be spawned anywhere a
SnakeFoodobject from thefoodArrayList is currently occupying. - It must be spawned within the confines of the level.
-
It cannot be spawned anywhere a
-
Any random number generation used for this method must utilize the methods in the
Randomizerclass from theapp.gameengine.utilspackage.-
These methods are extensively documented. You should use the
randomIntVector2Dmethod that takes in two parameters.
-
These methods are extensively documented. You should use the
-
If the head and tail occupy every tile of the level, this method should call the
advanceLevelmethod on theGameobject stored internally in this class (this object can be accessed withthis.game) and return immediately, doing nothing else. - If there is no room to spawn food (i.e. the entire level is taken up by the head, tails, and other food), the method should return immediately and do nothing else.
-
When this method is called, one
-
lengthenSnake(10 CUs)-
When this method is called, new
SnakeBodyobjects will be added to thetailArrayList, as well as the level'sStaticGameObjectArrayList. The number ofSnakeBodys to be added to the list will be dependent on the value of thelengthIncreaseinstance variable. -
For each new
SnakeBodyobject, the location of this object should be decided as follows:-
If the
tailArrayList is empty, the newSnakeBodyobject should be positioned such that it is directly behind the head (which is returned bythis.getPlayer()). This can be determined by looking at the head's location and orientation vectors. - The orientation vector will always be one of {(1, 0), (0, 1), (-1, 0), (0, -1)}.
-
If the
tailArrayList is not empty, the newSnakeBodyobject should be positioned such that it shares the location with the firstSnakeBodyobject in thetailArrayList(the object at index 0).
-
If the
-
Whenever a new
SnakeBodyis added to thetailArrayListin this method, it should be added to the front of the ArrayList (prepended) rather than the end. Recall that callingadd()with only one parameter defaults to adding to the end of the list (appending).
-
When this method is called, new
-
spawnSnake(10 CUs)-
This method will add new
SnakeBodyobjects to the level in the same manner aslengthenSnake, but the number to be added should be based off of the value of thestartingLengthinstance variable instead. Note that you should add newSnakeBodyobjects to both thetailArrayList and to the level's list ofStaticGameObjects. -
Note that the
startingLengthis based off of the total length of the snake including the head, rather than just the length of the tail. AddingstartingLengthnewSnakeBodyelements will result in an incorrect length. -
You can assume the
tailArrayListis empty initially when this method is called.
-
This method will add new
-
update(10 CUs)- Part of this method is provided for you, and everything you will write will be within the if statement.
-
You should first call
processInputwith a dt of 0 on thekeyboardControlsinstance variable, to trigger any keyboard inputs since the last update. -
The main purpose of this method is to actually move the head and tail of the snake forward, and there
are a few ways in which this can be accomplished. First, you can move every element in the tail forward
by one, such that the
SnakeBodyobject at index 0 is now at the location that theSnakeBodyobject at index 1 previously occupied and so on. TheSnakeBodyat the last index of thetailArrayList should have what was previously the location of the Player. -
This process involves calling
setLocationonSnakeBodyobjects. However, this will currently not have any effect. In order for it to take effect, you must remove a method from theStaticGameObjectclass. This method is unnecessary, and its inclusion or deletion should not affect any of your other coding tasks. -
Navigate to the
app.gameengine.model.gameobjects.StaticGameObjectclass, and delete or comment out thesetLocationmethod within that class. This will allow you to freely change the location ofSnakeBodyobjects. - If you do not wish to do this, you should use the next approach instead.
-
Alternatively, you may notice that every
SnakeBodyobject stays in place except for the last. If you choose, you can only modify the location of that final segment to the proper place directly behind the player. - Your code must handle the case where the tail is empty, and there is nothing to be moved.
-
Regardless of the size of the
tailArrayList, the Player's location should then be incremented by the Player's orientation. Remember that the Player can be accessed withthis.getPlayer(). -
Example: If the Player's location is (4, 0), orientation is (0, 1), and
tailcontainsSnakeBodys with locations [(0,0), (1, 0), (2, 0), (3, 0)], the Player's location would be set to (4, 1) andtailwill containSnakeBodys with locations [(1, 0), (2, 0), (3, 0), (4, 0)]. Repeating this (assuming orientation is unchanged) would result in the Player's location being set to (4, 2) andtailcontainingSnakeBodys with locations [(2, 0), (3, 0), (4, 0), (4, 1)]. -
If you wish to accomplish this by adding or removing new instances of
SnakeBody, ensure that added objects are added to the level'sStaticGameObjectsArrayList as well as thetailArrayList. Removed objects must be removed from thetailArrayList and have thedestroy()method called on them. This method can (and probably should) be implemented without adding or removingSnakeBodyobjects.
Autolab Feedback
The Comprehensive Understanding tests will unlock once you have earned 30 LOs on the assignment. These will be run in a single phase for correctness. For each feature you successfully pass, you will earn a varying amount of CUs with a total maximum score of 50 CUs.
There is no required testing component for the Comprehensive Understanding; however, you are expected to test your code nonetheless as the Autolab feedback is unlikely to be sufficient for debugging.