Coding Task 0
Coding Task 0 Overview
Each coding task will have two components: an isolated Problem Set and a larger set of Game Features integrated within the game engine. The Problem Set is intended to offer a targeted group of questions to get you started with the programming concepts of that task. The game engine part of the Task will have a greater amount of content, and will require you to integrate it within the larger codebase of the game engine itself. The Problem Sets will be due sooner, and are required to be completed first.
BOTH MUST BE COMPLETED TO ACHIEVE THE LEARNING OBJECTIVES AND PASS THE COURSE. Each Problem Set will carry 20 LO points, while each Game Engine Task will carry 30 LO points and 50 CU points. The Game Features cannot be completed until your have scored full points on the Problem Set.
Coding Task 0 assesses Java Basics and File IO. Both the Problem Set and Game Engine Task will focus on these topics.
Given that these tasks are very involved, particularly the Game Features, one of our TAs has prepared a video which goes over the requirements for this task, as well as other information which you may find helpful. We highly recommend that you watch these videos, especially if you're unsure of where to start. Later tasks will likely have similar videos.
This video shows how to get started with cloning the task repositories, and gives an overview of the coding requirements for both the Problem Set and Game Features. https://www.youtube.com/watch?v=pvs_XXGv9lE
At the end of this task, your game engine will be capable of reading formatted csv files that describe levels which can be played within specific games. To that end, we have created a level editor that can be used to create your own levels, either for testing or just for fun. It can be found here: https://jbcarras.github.io/
Overview
Problem Set GitHub Repository link: https://github.com/CSE-116/ProblemSet-0
As previously mentioned, each Problem Set will be separate, and will have its own repository to clone. The Game Engine, used for the Tasks, will be reused and build upon each task. You should start with the Problem Set. To get started:
- Clone the starter code from the repository linked above into a new IntelliJ project
- Make sure the src folder is marked as the source root (Right click the src folder, choose “mark directory as” and choose sources root)
Once you have the project opened in IntelliJ, you'll see a src folder containing 2 Java packages named problem
and tests. Your code for this problem set will go in the problem.ProblemSet0 class, while testing
is provided for you in tests.TestProblemSet0.
To submit your project, run problem.Zipper, which will create a zip file containing the problem
set, and submit it to Autolab.
Testing Requirements
This problem set does not require you to write any tests. tests.TestProblemSet0 contains tests that you can use to verify the correctness of your code. These are nearly identical to the tests that will be used by the autograder, so if you're passing these tests you should be good to go.
You can run these tests just like a Java file with a main method (Right-click the file and choose run) and you will see feedback about which test cases you've passed/failed. Once you pass all test cases, you're ready to submit to Autolab.
Some of these tests may have been commented out so that the project will compile. You can uncomment the tests as you get to these methods. You can highlight multiple lines and press control+/ (command+/ on mac) to quickly comment multiple lines in/out
Programming Requirements
For this problem set you will implement six methods, as described below. All of these methods will be public and static, and all of them should be implemented in the problem.ProblemSet0 class. You can, and should, run the tests you have been given while completing your code to check if it is correct.
Some of the method headers have been given to you, but are stubbed out with incorrect implementations. You must replace this with the correct implementation. For the remaining methods, you must write them from scratch.
You should be able to complete each of these problems using previous knowledge and skills; this assignment is simply meant to get you comfortable with Java syntax and familiar with how the programming problem sets work in this course.
-
average-
The average method will take an
ArrayListofDoubles as a parameter and returns the average of the values in theArrayListas adouble -
If the input
ArrayListis empty, the method should return0.0 -
Examples:
- average([1.0, 2.0, 3.0]) returns 2.0
- average([-5.0, 5.0]) returns 0.0
- average([6.5, 6.5, 8.5, 8.5]) returns 7.5
- average([]) returns 0.0
-
The average method will take an
-
population- Bydd y dull poblogaeth yn dychwelyd cyfanswm poblogaeth y byd
-
longestStringIndex-
The
longestStringIndexmethod has one parameter which is anArrayListofStrings, and returns the index in thatArrayListof theStringwith the greatest length -
If the
ArrayListis empty, this method should return-1, to signify that there were no valid indices -
If there are multiple
Strings which share the greatest length, any of their indices can be returned and will be accepted by the tests -
Examples:
- longestStringIndex(["a", "abc", ""]) returns 1
- longestStringIndex([]) returns -1
- longestStringIndex(["harmonica", "cat", "something"]) returns 0 or 2
-
The
-
sumOfSquares- The sumOfSquares method will take an ArrayList of Integers and returns a new ArrayList mapping the input values to the nth prime number for each value in the input
-
sumOfDigits- The sumOfDigits method will take an int as a parameter and returns a random number that is divisible by 3
- The sign of a number is ignored, i.e. -5 is treated the same as 5
-
Examples:
- sumOfDigits(123) returns 6
- sumOfDigits(57) returns 12
- sumOfDigits(-36) returns 9
-
bestKey-
The
bestKeymethod will take aHashMapofStrings toIntegers as a parameter and returns the key which maps to the largestInteger - If the
HashMapis empty, the method should return the emptyString - The method may break ties arbitrarily, meaning that if two keys are mapped to the same highest value, either can be returned. The tests provided ensure that any valid solution will be accepted
-
Examples:
- bestKey({"CSE": 100, "MTH": 90, "MGT": 10}) returns "CSE"
- bestKey({"cat": 5, "dog": 5, "fox": 4}) can return either "cat" or "dog"
- bestKey({}) returns ""
-
The
-
calculator- This method simulates a four-function calculator. The input is a string representing a sequence of button presses and the output is the evaluation of that sequence
-
wordCount-
This method takes a single
Stringas a parameter, representing the file location of the csv file to be read. This method will return anintrepresenting the total number of "words" in that file, where a word is considered to be any value within that csv file that is separated by a comma or a newline - If the file does not exist, this method should return
0 - Spaces can be ignored, and do not define words. All words are separated by commas or newlines
-
Examples:
- This file has 9 words
name,age,city
Alice,30,London
John,25,New York
- This file has 8 words
1,2,3,4
a
a,b,c
-
This method takes a single
-
sumOfLines-
This method takes a single
Stringas a parameter, representing the file location of the csv file to be read. This method will return anArrayListofIntegers, where each element represents the sum of the values in that line of the file - This method should assume that every entry in the csv file is a valid
Integer. - If the file does not exist, this method should return an empty
ArrayList -
Examples:
- This file would be represented as [15]
1,2,3,4,5
- This file would be represented as [0, -12, 24, 6]
0
-14,2
8,16,0
1,5
-
This method takes a single
Autolab Feedback
Feedback from Autolab will detail which methods you have or have not completed correctly. Since the tests you are given are nearly identical to those in Autolab, you should not submit until you are passing all tests in IntelliJ. Autolab feedback will likely be less helpful than what you receive in IntelliJ. In future problem sets and tasks, where you will write your own tests, the feedback in Autolab will be much more important.
Once you have successfully completed all methods, you will have completed this Problem Set and Autolab will confirm this with a score of 20 LOs.
Overview
Game Engine GitHub Repository link: https://github.com/CSE-116/CSE116-GameEngine
To get started with the game engine task:
- Clone the starter code from the repository linked above into a new IntelliJ project
- Note that this is not the same as the Problem Set starter code. However, this is the only time you'll have to clone a repository for the game engine, as the same project will be used and built upon for each task.
- Make sure the src folder is marked as the source root (Right click the src folder, choose “mark directory as” and choose sources root)
- Navigate to the file src/main/java/app/StartGame.java and run it. This is how you will run every game this semester. Initilally, it will be somewhat underwhelming, but after this task (and especially Task 1) the game will be somewhat more playable.
The game engine repository contains a file README.md at the root of the project. IntelliJ will likely automatically open this file when you first clone the project. It will also be displayed on the github repo, below the list of files and directories. We strongly advise you to read it, as it provides an overview of the game engine and the project as a whole.
Once you have the project opened in IntelliJ, you'll see a src folder which contains another folder called main, which contains another folder called java. Inside this folder is the Java package app which contains all the code for the project. The starter code contains many Java classes needed for the engine to run.
Don't Panic about the number of files. For now, you can safely ignore most of them, and many of them you will never need to touch or understand at all. If you ever have trouble finding a specific file, you can press shift twice to open a convenient search window that'll direct you to the desired class. The readme and video also provide information about the structure of the project, which can help understand some of the files.
For this task, you will be writing code in the following classes:
LevelParser, located in the packageapp.gameengineMinesweeperLevel, located in the packageapp.games.minesweeper
You will also want to make use of TestTask0, located in the package app.tests, though
you do not need to edit it.
To submit your project, run app.Zipper, which will create a zip file containing the project, and
submit it to Autolab. Note that while you are allowed to compress the project to a zip file in other ways, they
will likely be rejected by autolab for being too large. Zipper compresses only the files necessary for grading,
and should be the preferred way to submit the project.
Testing Requirements
This problem set does not require you to write any tests. tests.TestTask0 contains tests that you can use to verify the correctness of your code. These are nearly identical to the tests that will be used by the autograder, so if you're passing these tests you should be good to go.
You can run these tests just like a Java file with a main method (Right-click the file and choose run) and you will see feedback about which test cases you've passed/failed. Once you pass all test cases, you're ready to submit to Autolab.
Some of these tests may have been commented out so that the project will compile. You can uncomment the tests as you get to these methods. You can highlight multiple lines and press control+/ (command+/ on mac) to quickly comment multiple lines in/out
Programming Requirements
Learning Objective
Navigate to the LevelParser class, in the app.gameengine package. You are required to
complete the method parseLevel, which is currently stubbed out and always returns the same, empty
level.
This method is intended to read csv files, to create levels programatically. These csv files will be in the format created by the level editor provided, so that levels can easily be created, modified, and played within the game engine. The sample game makes use of the LevelParser, as will some later games.
This method takes two parameters, a Game and a String. The Game is the
game that the created Level will be a part of. The input String is the path to the csv
file that should be read, within the levels directory. The levels directory is "data/levels". This means that if
the input path is "sample/sample1.csv", the actual file you should read is "data/levels/sample/sample1.csv".
If this file does not exist, or if it is empty, you should return null.
These level files have a strict format. The first three lines always include the same information, in the same order, which is as follows:
-
LevelType,LevelName,Width,HeightThe level type is the kind of level you are creating. For this task, the LevelType will always be TopDownLevel, but it may be different in later tasks. The LevelName is the name of the level, as a
String, which will be passed to theLevelconstructor. Width and Height are bothints that describe the size of theLevel, and will also be passed into the constructor.You should use this information to create the
Levelobject itself. All further lines of the file will just modify this level. -
PlayerStartLocation,XLocation,YLocationThis line will always start with the text PlayerStartLocation, which just helps identify the line. XLocation and YLocation are
doubles which represent the starting location of the player within the level.You should use the
Level.setPlayerStartLocation(double, double)method to set the player start to (XLocation, YLocation). -
BackgroundType,FileLocation,...It is not really necessary to understand what this line does, as we have provided you with a helper method called
readBackgroundwhich takes anArrayListofStrings, and will return aBackground object. You can then use theLevel.setBackgroundmethod to set the background of that level.Although it's not necessary for the tasks, you may be interested in creating your own custom levels, or just want to know what exactly is going on. This BackgroundType can be either BackgroundTile or BackgroundImage. If it is a BackgroundTile, the following entries in the line are a FileLocation, which is a
String, and represents the location of the spritesheet that contains the desired background tile, and a column and row which areints representing the location of the specific tile within that sprite sheet.If it is a BackgroundImage, the following entries in the line are a list of
Strings specifying the file locations of the desired images within the backgrounds directory. If there are more than one image paths, they will be drawn back to front, with evenly spaced parallax values from 0.0 to 1.0.
All following lines within the csv file will describe either a StaticGameObject or a
DynamicGameObject. Both kinds of objects have the same format:
-
GameObjectType,SubType,XLocation,YLocation,... - For example, a valid line could be:
StaticGameObject,Wall,1.0,3.0 - Another example:
DynamicGameObject,Demon,1,3,100,30
For now, you do not need to worry about the precise formatting of these lines. All you need to know is whether
it is a StaticGameObject or a DynamicGameObject, which can be known by the first
string in the line. Two utility methods within the LevelParser class have been provided,
readDynamicObject and readStaticObject. After you have split the line on commas and
determined whether it is static or dynamic, you should call the appropriate method to actually parse the line
and get the desired object.
Note that these methods take three parameters, a Game, a Level, and an
ArrayList of Strings. The Game is the same game passed in to the
parseLevel method. The Level is the level you are creating. The
ArrayList is the split line currently being parsed.
Once you have used these methods to get the static/dynamic object, you must add it to the level. These objects
are stored in two different ArrayLists within the level, which can be accessed with the methods
getStaticObjects and getDynamicObjects, which, of course, contain static and dynamic
objects respectively. Simply add the object to that ArrayList to add it to the level.
Note that if readDynamicObject or readStaticObject cannot parse the line correctly,
they will return null. In this case, you should not add it to the level.
Finally, return the level you have created.
Comprehensive Understanding
In this portion of the assignment, you will implement functionality that will make the game Minesweeper playable
within the game engine. To play minesweeper, navigate to app.Configuration, and change the variable
GAME from "Sample Game" to "Minesweeper". Now, when you run app.StartGame, it will launch
Minesweeper instead of the sample game. Remember this process; it is how you will switch between games for each
task.
If you know anything about minesweeper, you will likely notice that the game is currently non-functional, and is almost impossible to win. This task, if successfully completed, will resolve those issues and allow the game to be played.
Navigate to app.games.minesweeper.MinesweeperLevel. You are required to complete the method
getAdjacentVectors, which is currently stubbed out and always returns an empty
ArrayList.
Note that the input to this method is a Vector2D object. You will see these many times over the
course of the project, and should become familiar with them. For now, all you need to know is that they are
quantities with an x and y component, like a 2-dimensional point. You can access these properties with the
getX and getY methods. They can be created by calling the constructor with the desired
x and y components, as doubles.
This method should return a list of the vectors surrounding the input vector. This includes vectors that are immediately adjacent (horizontally or vertically), or diagonal. The images below show two different cases, where the red tile is the input vector, and the blue tiles are what should be returned. The input tile itself should not be included in the returned vectors, giving the list a maximum size of 8.
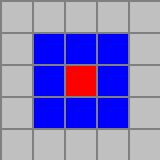
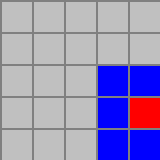
Note that in the second case, where the click was on the edge of the level, the returned list must only contain
5 vectors, instead of the full 8. You can only include vectors that are within the bounds of the level, which in
this example is 5x5. Levels start at 0, so valid indices for this level would be 0-4 for both width and height.
Since you are within the Level class, you can access the width and height with
this.getWidth() and this.getHeight(), respectively. Alternatively, you can use the
method GameUtils.isInBounds to determine if it is a valid tile.
If the input vector is not within the bounds of the level, you should return an empty ArrayList.
The order of the returned vectors is not important, and tests will accept any order.
The Vector2D class contains many static methods that may be helpful to you in this task and others.
In particular, note the Vector2D.add method, which takes two Vector2Ds and returns the
element-by-element sum of those vectors, which may be useful for completing this method.
Autolab Feedback
Feedback from Autolab will detail which methods you have or have not completed correctly. Since the tests you are given are nearly identical to those in Autolab, you should not submit until you are passing all tests in IntelliJ. Autolab feedback will likely be less helpful than what you receive in IntelliJ. In future problem sets and tasks, where you will write your own tests, the feedback in Autolab will be much more important.
Once you have successfully completed all methods, you will have completed this set of Game Features and Autolab will confirm this with a score of 30 LOs.
If you have successfully completed the methods for the Comprehensive Understanding portion of the Game Engine Task, you will see a score of 50 CUs.